How To Lay Out Tile Patterns On A Shower Wall

12 X 12 12 X 24 Shower Layout Inspiration Tile Layout Shower Tile Designs Shower Tile Patterns

Image Result For 12x24 Shower Tile Patterns Beige Soldier Patterned Bathroom Tiles Shower Wall Tile Bathroom Remodel Shower

12x24 Tile Shower Pictures How To Tile A Shower Wall With Tiles Elegant X Tile Shower Google Search Bath 12 Shower Tile Shower Wall Tile Bathroom Tile Designs

Your Guide To Tile Pattern Layouts Patterned Bathroom Tiles Tile Bathroom Tile Patterns

12 X24 Tile Layout Bathtub Tile Tile Layout Bathroom Tub Shower

Supreme 12x24 Tile Layout Travertine Tile Installation How To Lay Tile Diagonally Uneven Tile Insta Shower Wall Tile Shower Tile Patterns Bathroom Shower Walls
A 50 50 offset the most common brick running bond pattern creates a strong traditional look.
How to lay out tile patterns on a shower wall.

Pick Your Pattern A Visual Guide To Tile Layouts Tile Layout Large Shower Tile Trendy Bathroom Tiles

21st Century Tile Home Patterned Bathroom Tiles Luxury Bathroom Tiles Bathroom Tile Designs

12x24 Wall Tile Grid Pattern In Walk In Shower Niche Large Shower Tile Tile Walk In Shower Large Tile Bathroom

12x24 Horizontal Tile Brick Pattern Shower Patterned Bathroom Tiles Brick Pattern Tile Tile Layout

8 X 20 Tile Patterns Google Search Tile Patterns 12x24 Tile Patterns 12x24 Tile

9 Different Ways To Lay Subway Tiles Alice Lane Home Interior Design Subway Tile Kitchen Kitchen Wall Tiles Kitchen Tiles Backsplash

Recent Tile Jobs Englewood Tile Store Mann Tile Inc Vertical Shower Tile Tile Layout Shower Tile

Tile Pattern Change Upper Tile Diamond Pattern Lower Straight Pattern Decorative Border With Dia Patterned Bathroom Tiles Tile Bathroom Shower Tile Patterns

Shower Tile Kenya Silver Ceramic Wall Tile 8 X 24 In Guest Bathroom Renovation Large Shower Tile Small Bathroom Makeover

Herringbone Layout Of A 12 X 24 Tile In A Custom Shower Shower Tile Designs Shower Wall Tile Master Bath Shower Tile

12x12 Tile Patterns Google Search Patterned Bathroom Tiles Bathroom Tile Installation Tile Bathroom

I Designed This Shower Using 12 X 24 Tiles In A Subway Layout The Tiles Go Above The Window Kitchen Design Styles Tile Design Pattern Tuscan Kitchen Design

Things To Consider Before Flooring Installation Flooring Installation Patterns Tile Instal Tile Installation Patterns Subway Tile Patterns Tile Layout Patterns

Cheat Sheets Stacy Nance Interiors Floor Tile Design Tile Layout Tile Design

In This Beautiful Walk In Zero Entry Master Bathroom Shower The Walls Are 12x24 Honed White Carrer Small Bathroom Tiles Master Bathroom Shower Shower Remodel

Tiles 12x24 Tile In A Small Bathroom 12x24 Bathroom Tile Layout Small Tile Shower Small Tiles Bathroom Floor Tile Small Bathroom Floor Tiles Bathroom Flooring

Bathroom Design Tile On Instagram Patterned Bathroom Tiles Subway Tiles Bathroom Herringbone Subway Tile

Shower Tile Design Ideas Pictures Remodel And Decor Bathroom Shower Design Traditional Bathroom Shower Remodel
Https Encrypted Tbn0 Gstatic Com Images Q Tbn 3aand9gcriziqidxztmmolnywiwag Vbozfzbpqt9jikg6dy6t0j8ttrzw Usqp Cau

Tile Floor Patterns To Spark Your Bathroom Tile Design Ideas Tile Design Pattern Patterned Floor Tiles Floor Pattern Design

Tile Patterns Layout Ideas Tile Lines Bathrooms Remodel Bathroom Shower Tile Gray Shower Tile

Incoming 12 X 24 Tile Pattern Ideas 12 By 24 Bathroom Tile 12 Tile Patterns Tile Bathroom Patterned Bathroom Tiles

4 X 16 Subway Tile In Shower In Herringbone Pattern Google Search Bathroom Installation Gorgeous Bathroom Designs Tile Layout

Skybridge Off White 12x12 Wall Tile Installed Brick Joint Shower Wall Tile Tile Layout Shower Tile

12x24 Tile In Herringbone Pattern With Sahara Beige Grout Tile Layout Patterned Floor Tiles Floor Tile Design

Tile Patterns And Layouts The Tile Shop Blog Shower Tile Designs The Tile Shop Tile Layout Patterns

Tile Pattern 33 Stagger Floor Tiles Door Lighting Home Interior Design An Bathroom Floor Tile Patterns Floor Tile Patterns Layout Patterned Floor Tiles

Subway Tile Designs Inspiration A Beautiful Mess Subway Tile Design Subway Tile Patterns Subway Tile
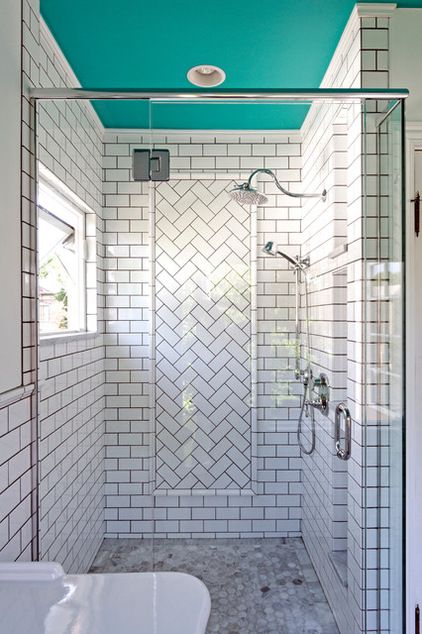
Room Of The Day A Splash Of Turquoise In A Vintage Inspired Bath Bathrooms Remodel Bathroom Design Painted Ceiling

12x24 Tile Installed Horizontal Brick Pattern Rain Head Tile Bathroom Brick Patterns Tile Installation

Related Image Shower Tile Patterns Shower Tile Tile Bathroom

Pin By Covenant Developments On Decorating Tidbits Tile Bathroom Bathroom Redo Shower Tile

Tile Patterns And Layouts The Tile Shop Blog Patterned Bathroom Tiles Bathroom Layout Bathroom Interior Design

Beautiful Bathroom Renovation Project Featuring 8 X 20 Wall Tiles 12 X 24 Porcelain Floor Tiles Riobe Shower Wall Tile Bathtub Tile Bathroom Shower Walls

Tile Bathroom Pattern Google Search Tile Layout 12x24 Tile Patterns Small Bathroom

Herringbone 4 X 12 Matte White Tile In The Shower Shower Tile Designs Herringbone Tile Bathroom White Herringbone Tile Bathroom

Diy Websites In Canada Websites Ca Subway Tile Patterns Vertical Shower Tile Shower Tile

Subway Tile In A Herringbone Pattern Lemon Grove Avenue In 2020 Bathroom Shower Walls Herringbone Tile Herringbone Subway Tile

Am Dolce Vita Subway Tile Stacked Or Brick Pattern Tile Bathroom Patterned Bathroom Tiles Bathroom Wall Tile

Skybridge 12x12 Off White In Diamond Pattern Diamond Tile Pattern Shower Tile My Home Design

10 Ways To Use Subway Tile That Aren T Boring Af Flippinwendy Design Vertical Shower Tile Blue Shower Tile Bathroom Remodel Shower

Shower Design Using 12x12 Tiles From Lowes Bathroom Design Modern Bathroom Decor Master Bathroom

2 X 6 Glass Tile Basement Bathroom Glass Tile Pattern Basement Bathroom Remodeling
1
Source : pinterest.com
